


Varškės desertas su uogomis – švelnus, be kepimo paruošiamas saldumynas, tirpstantis burnoje
Šis varškės desertas – lengvas, purus ir elegantiškas pasirinkimas, kai norisi kažko saldaus be ilgo darbo virtuvėje. Jam nereikia orkaitės,...


Greiti chačiapuri – minkšti, sūrio kupini ir paruošiami per kelias minutes
Šie greiti chačiapuri – tikras išsigelbėjimas, kai norisi šilto, sotaus ir labai gardaus užkandžio be ilgo laukimo. Skirtingai nei tradiciniai...


Kopūstų blyneliai su kefyru „Traškūs debesėliai“ – lengvi, purūs ir nepaprastai gardūs
Šie kopūstų blyneliai – tikras atradimas tiems, kurie mėgsta paprastus, bet išraiškingo skonio patiekalus. Išorėje jie maloniai traškūs, o viduje...


Pyragas su mėlynėmis – drėgnas, sodraus uogų skonio ir lengvai paruošiamas vasaros desertas
Pyragas „Zamaruška“ su mėlynėmis – tai paprastas, bet išskirtinai gardus kepinys, kuris sužavi savo drėgna tekstūra ir intensyviu uogų skoniu....


Krabų lazdelės sūrio tešloje – traškus užkandis su tirpstančiu sūrio įdaru
Krabų lazdelės sūrio tešloje – tai greitai paruošiamas, sotus ir itin gardus užkandis, kuris puikiai tinka tiek jaukiam vakarui namuose,...


Purūs mieliniai pyragėliai su kefyru ir uogiene – minkšti, kvapnūs ir tirpstantys burnoje
Mieliniai pyragėliai su kefyru – tai vienas iš tų kepinių, kuris visada sukelia jaukumo jausmą. Vos tik pradeda sklisti kepančios...


Hasselback bulvės – traškios išorėje, minkštos viduje ir kupinos česnako aromato
Hasselback bulvės – tai įspūdingai atrodantis, tačiau labai paprastai paruošiamas patiekalas, kilęs iš Švedijos virtuvės. Iš pirmo žvilgsnio jos atrodo...


Žuvies pyragas su kefyru „Paprastesnio nebūna“ – sultingas, traškus ir paruošiamas vos per valandą
Jeigu ieškote greito, sotaus ir visada pavykstančio kepinio pietums ar vakarienei, šis žuvies pyragas su kefyru taps tikru išsigelbėjimu. Minkšta,...


Purios spurgos su kefyru – minkštos, auksinės ir tirpstančios burnoje
Purios spurgos su kefyru – tai paprastas ir greitas kepinys, kuris visada pavyksta. Jos minkštos, lengvos, švelniai saldžios, su gražia...


Vištienos plovas moliniuose indeliuose – aromatingas, sotus ir paprastai paruošiamas patiekalas
Vištienos plovas moliniuose indeliuose – tai jaukus, naminis patiekalas, kuris dvelkia tradicine virtuve ir primena lėtai krosnyje troškintą maistą. Kepant...
-

 Receptai2 years ago
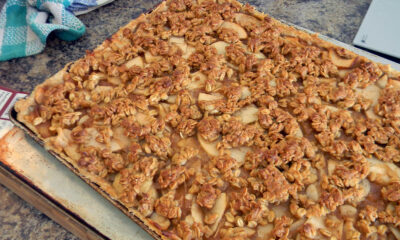
Greitas ir purus obuolių pyragas: paprastas receptas per 45 minutes
-

 Receptai1 year ago
Rauginti agurkai su degtine – kaip turguje. Patikimas receptas iš kartos į kartą
-

 Receptai1 year ago
Greiti kefyro blyneliai su faršu – skanesni nei čeburekai ar beliašai!
-

 Receptai2 years ago
Be galo skanūs varškės sausainiai per 5 minutes!
-

 Receptai2 years ago
Gardžioji daržovių mišrainė žiemai: vitaminų bomba tavo stalui
-

 Receptai2 years ago
Tirpstantys burnoje pyragaičiai per kelias minutes! – Receptas
-

 Receptai11 months ago
Kaimiškos daržovių salotos žiemai
-
 Receptai2 years ago
Avižų ir obuolių pyragas – sveika alternatyva be miltų